BI Publisher

App Engine Output Report

For printing .XLS/.XLSX format output reports in process monitor logs/report repository in BI Publisher reports , We need to add below piece of code in your App Engine,

SELECT PRCSOUTPUTDIR FROM PSPRCSPARMS WHERE PRCSINSTANCE = AETRecord.ProcessInstance

Next, Assign the value of PRCSOUTPUTDIR to Report definition object.

&oRptDefn = create PSXP_RPTDEFNMANAGER:ReportDefn(“Report_ID”);
&oRptDefn.Get();
&oRptDefn.OutDestination = “Value from PRCSOUTPUTDIR”;

BI Publisher, PeopleCode

PeopleCode to Create XML file – BI Publisher Report

In Bi Publisher there are three methods to create XML files as data source.

  • PS Query Based
  • Row-set Based
  • Manually Creating XML file

To create XML files through PS Query and Row-set methods, need to import delivered App package ”PSXP_XMLGEN

PeopleCode to create XML file through Rowset:

Local Rowset &rsRowset;

Local File &fXMLFile, &fXSDFile;

Local string &strXSDFileName, &strXMLData, &strXMLSchema, &strPSHome;

Local PSXP_XMLGEN:RowSetDS &objRowsetDS = create PSXP_XMLGEN:RowSetDS();

&strFileName = &filename;

&rsRowset = &rs;

&strXMLFileName = %This.XMLFilePath | &strFileName | “.xml”;

&strXSDFileName = %This.XMLFilePath | &strFileName | “.xsd”;

/*******************Create XML Schema File *****************/

&strXMLSchema = &objRowsetDS.getXSDSchema(&rsRowset);

&fXSDFile = GetFile(&strXSDFileName, “w”, %FilePath_Absolute);

&fXSDFile.WriteLine(&strXMLSchema);

&fXSDFile.Close();

/*******************Create XML File *****************/

&strXMLData = &objRowsetDS.getXMLData(&rsRowset, &strXSDFileName);

&fXMLFile = GetFile(&strXMLFileName, “w”, %FilePath_Absolute);

&fXMLFile.WriteLine(&strXMLData);

&fXMLFile.Close();

PeopleCode to create XML file manually:

Local XmlDoc &inXMLDoc;

Local XmlNode &xRootNode, &xMonthNode, &xAmountNode, &xSummaryNode,;

&inXMLDoc = CreateXmlDoc(“<?xml version=’1.0′, encoding=’UTF-8’STANDALONE=’yes’?><ROOT/>”);

&inXMLDoc.DocumentElement.AddAttribute(“xmlns:xsi”,

http://www.w3.org/2001/XMLSchema-instance&#8221;);

&xRootNode = &inXMLDoc.DocumentElement.AddElement(“MAIN”);

&xSummaryNode = &xRootNode.AddElement(“SUMMARY”);

&xMonthNode1 = &xSummaryNode.AddElement(“JAN”);

&xMonthNode1.NodeValue = String(&nbrAmount);

&xMonthNode2 = &xSummaryNode.AddElement(“DEC”);

&xMonthNode2.NodeValue = String(&nbrAmount);

/*To add Child Nodes dynamically either through For loop or While Loop*/

&sqlSummary=CreateSQL(“SELECT MONTH,AMOUNT FROM PS_TEST_TBL”);

While &sqlSummary.Fetch(&nbrMonth, &nbrAmount)

&xDataNode = &xRootNode.AddElement(“SUMMARYDATA”);

&xMonthNode = &xDataNode.AddElement(“MONTH”);

&xMonthNode.NodeValue = &strMonth;

&xAmountNode = &xDataNode.AddElement(“AMOUNT”);

&xAmountNode.NodeValue = String(&nbrAmount);

End-While;

&strXMLFileName = %This.FilePath | &strFileName | “.xml”;

&fXMLFile = GetFile(&strXMLFileName, “w”, %FilePath_Absolute);

If &fXMLFile.IsOpen Then

&strXMLData = &inXMLDoc.GenFormattedXmlString();

&fXMLFile.WriteLine(&strXMLData);

&fXMLFile.Close();

Else

Error (“Temporary XML file creation failed. Please contact your System Administrator”);

End-If;

PeopleCode to display a report in PDF format:

Import PSXP_RPTDEFNMANAGER:*;

Local string &strRptDefnId, &strTemplateId, &strLanguageCd, &strOutputfmt, &strOutDest;

Local date &dtAsofdate;

Local Rowset &rsOutput;

Local PSXP_RPTDEFNMANAGER:ReportDefn &objReportdefn;

&strFileName = “APPaycheck”;

&strRptDefnId =” APPAYCHECK”;;

&strTemplateId = “APPAYCHECK_1”;

&strOutputfmt = “PDF”;

&strLanguageCd = “ENG”;

&dtAsofdate = %Date;

&strXMLFileName = %This.XMLFilePath | &strFileName | “.xml”;

&strOutDest = %This.XMLFilePath;

&objReportdefn = create PSXP_RPTDEFNMANAGER:ReportDefn(&strRptDefnId);

&objReportdefn.Get();

&objReportdefn.SetRuntimeDataXMLFile(&strXMLFileName);

/*To store the PDF report with the given name, provide the following properties to the report definition object*/

&objReportdefn.OutDestination = &strOutDest;

&objReportdefn.ReportFileName = &strFileName;

/*Generate and Display PDF Report*/

&objReportdefn.ProcessReport(&strTemplateId, &strLanguageCd, &dtAsofdate, &strOutputfmt); CommitWork();

/*To display the report on line*/

&objReportdefn.DisplayOutput();

/*To print the report*/

&objReportdefn.PrintReport();

/*PeopleCode to delete the XML file created after displaying the report */

try

Local File &fTempFile = GetFile(&strXMLFileName, “W”, %FilePath_Absolute);

&fTempFile.Delete();

catch Exception &ExCleanup

Warning (“Clean-Up of temporary XML File failed with Exception:” | &ExCleanup.ToString());

end-try;
PeopleSoft Concepts

Inconsistent datatypes: expected – got CLOB Issue in UNION’s with Long-Char Fields in PeopleSoft SQL Views

If we use Long character fields directly in SQL UNION Statements then will get below error:

‘inconsistent datatypes: expected – got CLOB’.

Example:

select field1,longfield2 from Table1  union select field1,longfield2 from Table2

Error: inconsistent datatypes: expected – got CLOB

Solution: Use To_char(longfield2) in the SQL.

Example:

select field1,to_char(longfield2) from Table1  union select field1,to_char(longfield2) from Table2

PeopleCode

PeopleCode to Import data from Multiple files into PS Records

Sample Peoplecode to import data from multiple text(.txt) files into PeopleSoft Records using FindFiles Function as below,

/*PeopleCode to Import Data into Record from Multiple .txt files */
Local File &FILE1;
Local Record &REC1;
Local SQL &SQL1;
Local Rowset &RS1, &RS2;
Local string  &path;

Local array of string &ARRAY;
Local string &STRING;

Local array of string &aFileNames = CreateArrayRept(“”””, 0);
Local File &fSourceFile;
&path = “D:\InboundFiles\*.txt”;

&aFileNames = FindFiles(&path, %FilePath_Absolute);

MessageBox(0, “”, 0, 0, “&aFileNames.Len:” | &aFileNames.Len);
While &aFileNames.Len > 0

&fSourceFile = GetFile(&aFileNames.Shift(), “R”, %FilePath_Absolute);

&REC = CreateRecord(Record.SY_SYSTEM_INFO);
&ARRAY = CreateArrayRept(“”, 0);

If &fSourceFile.IsOpen Then

If &fSourceFile.SetFileLayout(FileLayout.SY_SYSTEM_INFO_FLO) Then
While &fSourceFile.ReadLine(&STRING);
&ARRAY = Split(&STRING, “;”);
For &I = 1 To &REC.FieldCount
&REC.GetField(&I).Value = &ARRAY [&I];
End-For;
/* do additional processing here for converting values */
&REC.Insert();
End-While;
Else
/* filelayout not correct */
End-If;
Else
/* file not open */
End-If;

&fSourceFile.Close();

End-While;

PeopleSoft Fluids

PeopleSoft Pagelets as Fluid Tiles

Scenario: Create PeopleSoft Fluid tile with Data source as PeopleSoft Pagelet.

Step 1: Create PeopleSoft Pagelets.

Step 2: Create Content reference with fluid parameters.

Step 3: Publish the content reference as Fluid tile.


Step 1: Create PeopleSoft Pagelets:

let’s see the development of Basic PeopleSoft Pagelets..!!

Navigation to create the PeopleSoft Pagelets:

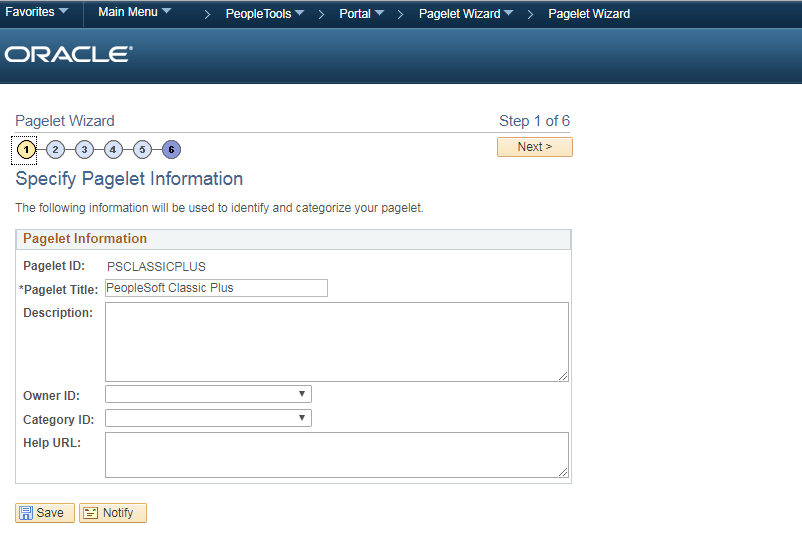
Root >> PeopleTools >> Portal >> Pagelet Wizard >> Pagelet Wizard

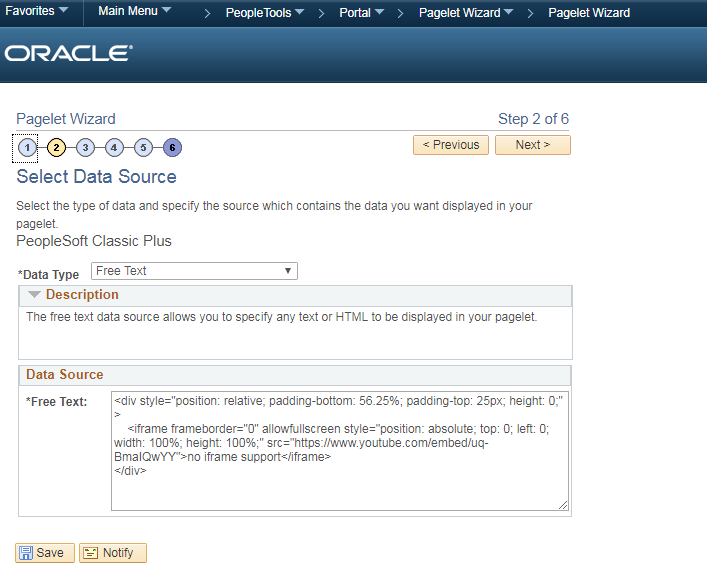
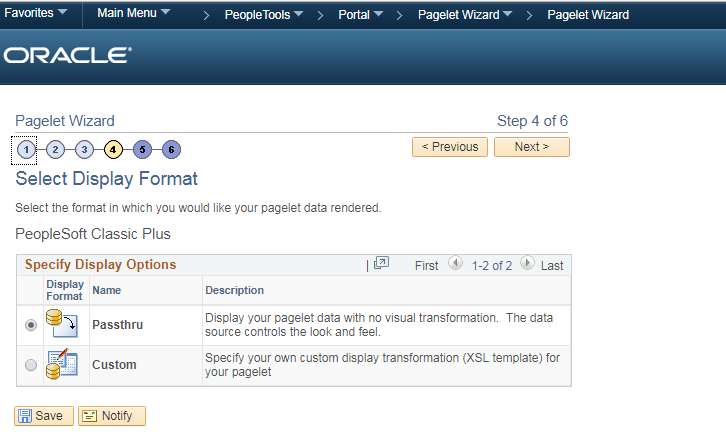
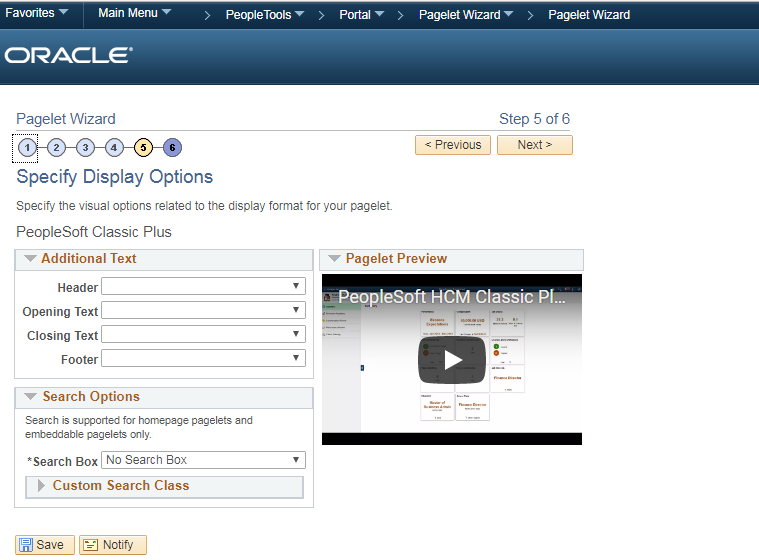
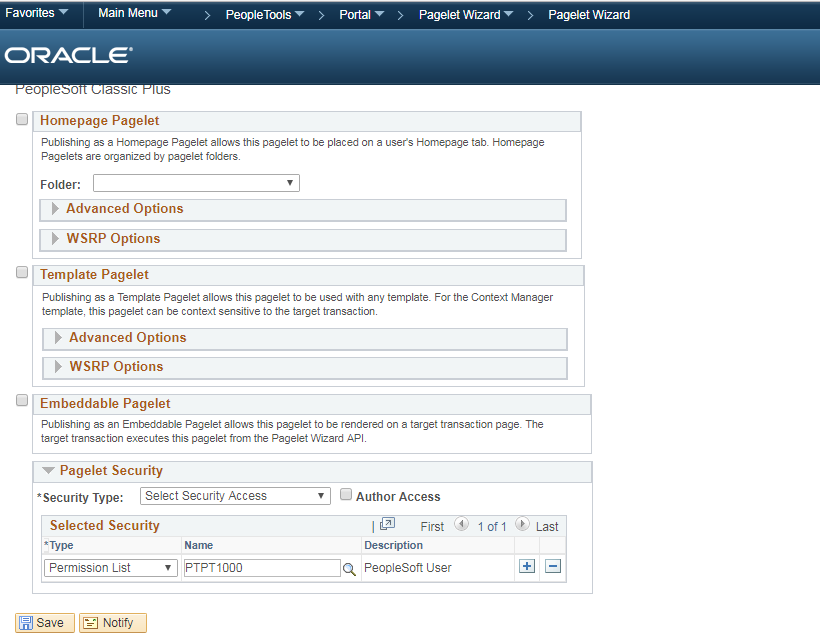
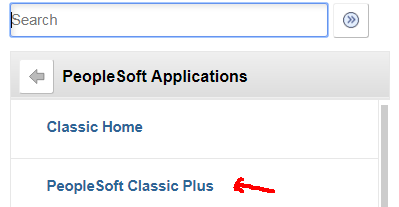
Now, In this Example, Embedding the PeopleSoft classic plus YouTube video into PeopleSoft Pagelet.

1.PG2.PG


3.PG4.PG5.PG

Now, PeopleSoft Pagelet development has been completed. let’s see the 2nd step..!!

Step 2: Create Content reference with fluid parameters:

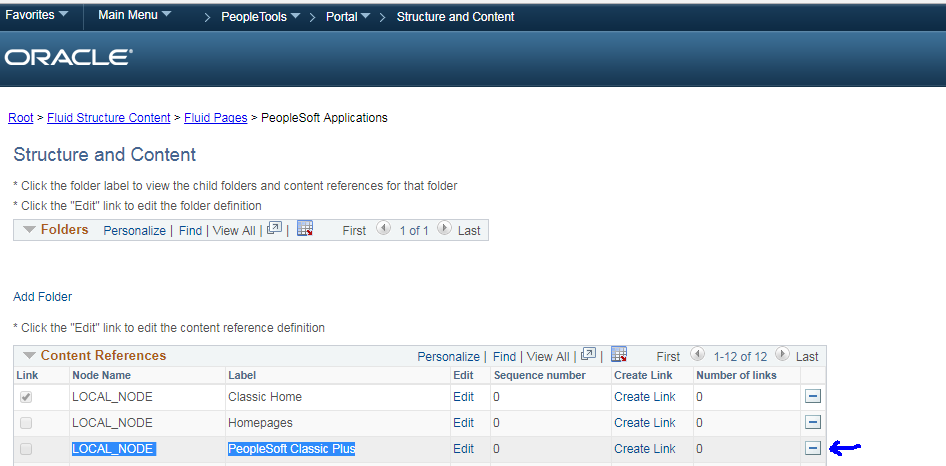
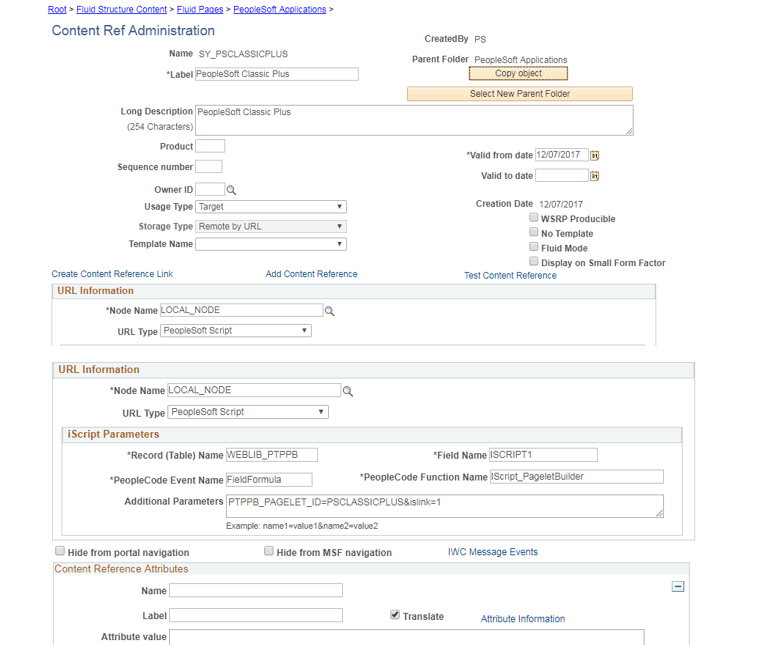
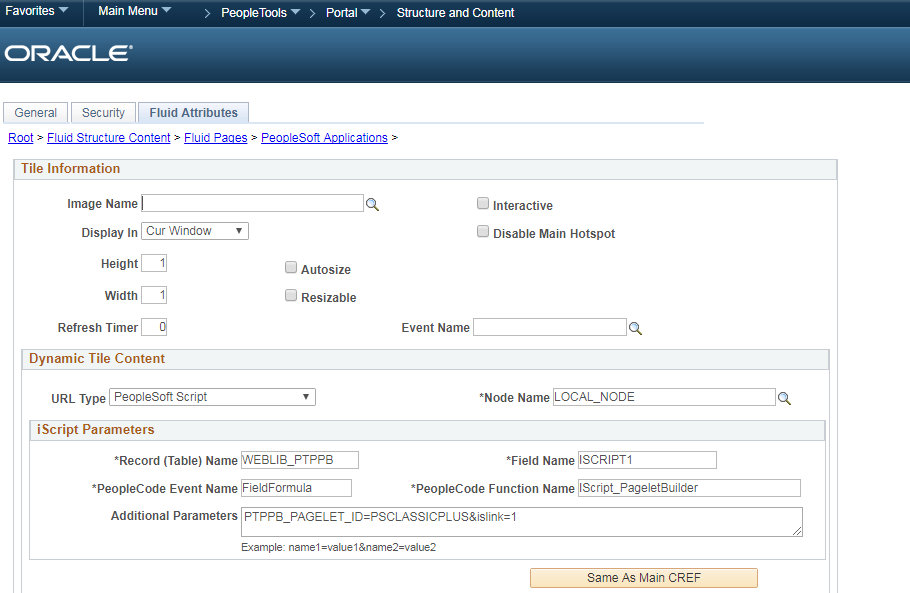
Now, create the content reference in specific folder with parameters as shown below.

1.SC

2.SC

3.SC

Step 3: Publish the content reference as Fluid tile:

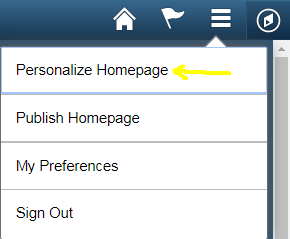
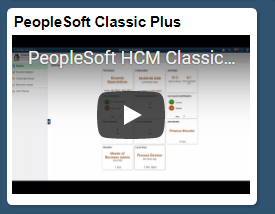
Next, Publish the Pagelet embedded Content reference in fluid landing page.

3.FT

Click on “Add Tile” button.

4.FT

Traverse into your created content reference location.

5.FT

Added fluid tile in landing page as shown below.

2.FT

Done..!! Successfully added the PeopleSoft Pagelets to the PeopleSoft Fluid landing page.

PeopleCode

PeopleCode to get Site name from URL

PeopleCode to get Site name from URL as written below.


Local integer &POS, &POS2, &POS3, &I;
&strLogoutURL = %Request.LogoutURL;

&POS = (Find(“/psp/”, &strLogoutURL) + 5);
&POS2 = Find(“/”, &strLogoutURL, &POS);

Local string &SiteName, &Char, &ParseSiteName;
&SiteName = Substring(&strLogoutURL, &POS, &POS2 – &POS);

&POS3 = 0; /* code to remove any _number from the signout URL */
For &I = 1 To Len(&SiteName)
&Char = Substring(&SiteName, &I, 1);
If &Char = “_” Then
&POS3 = &I;
End-If;
End-For;

If &POS3 <> 0 Then
&ParseSiteName = Substring(&SiteName, &POS3 + 1, Len(&SiteName) – &POS3);
If IsNumber(&ParseSiteName) Then
&SiteName = Substring(&SiteName, 1, &POS3 – 1);
End-If;
End-If;

PeopleCode

Extracting ZIP files through PeopleCode

Sometimes we need to extract the ZIP files and then load the extracted file data into PeopleSoft tables using interfaces.

Now, in this scenario will see how to extract the ZIP File using PeopleCode.

Find the below sample code to unzip the ZIP files.

Local string &SourceZipFilePath, &targetPath;

&SourceZipFilePath= “D:\PSOFT\PSREPORTS\FIN92TST\FILES\Expenses.zip”;
&targetPath= “D:\PSOFT\PSREPORTS\FIN92TST\FILES\”;

Local JavaObject &zipFileInput = CreateJavaObject(“java.io.FileInputStream”, &SourceZipFilePath);
Local JavaObject &zipInputStream = CreateJavaObject(“java.util.zip.ZipInputStream”, &zipFileInput);
Local JavaObject &zipEntry = &zipInputStream.getNextEntry();
Local JavaObject &buf = CreateJavaArray(“byte[]”, 1024);
Local number &byteCount;

While &zipEntry <> Null

If (&zipEntry.isDirectory()) Then
/****Nothing to process****/
Else
Local JavaObject &OutputFile = CreateJavaObject(“java.io.File”, &targetPath| &zipEntry.getName());
&OutputFile.getParentFile().mkdirs();
Local JavaObject &out = CreateJavaObject(“java.io.FileOutputStream”, &OutputFile );
&byteCount = &zipInputStream.read(&buf);

While &byteCount > 0
&out.write(&buf, 0, &byteCount);
&byteCount = &zipInputStream.read(&buf);
End-While;

&zipInputStream.closeEntry();
End-If;

&zipEntry = &zipInputStream.getNextEntry();
End-While;

&zipInputStream.close();
&zipFileInput.close();
&out.close();

PeopleCode, PeopleSoft Concepts

PeopleSoft with Google Maps Directions

Recently we got one simple requirement,by providing the Source and Destination address then we have to get the directions in new window.

Scope:

Source: Work Address; Destination: Home Address,when we click on Search button we have to get Directions(Using Google Maps).

I have tried this requirement in my personal PC with just two fields Source Address,Destination Address and search button as shown below.

Directions_1

for this requirement we need to pass the From Location and to location values to the google Maps direction link then we can achieve our requirement.

Please find the below PeopleCode for more details.

In field change event(search Directions)

Local string  &Fromaddr,&Toaddr;

&Fromaddr = SY_MAPS_INT_WRK.SY_FROM_LOCATION.Value;
&Toaddr = SY_MAPS_INT_WRK.SY_TO_LOCATION.Value;

&Map_Selection = “http://maps.google.com/maps?saddr=%FromAddr%&daddr=%ToAddr%&#8221;;
&Map_Selection = Substitute(&Map_Selection, “%FromAddr%”, &Fromaddr);
&Map_Selection = Substitute(&Map_Selection, “%ToAddr%”, &Toaddr);
ViewContentURL(&Map_Selection, True);

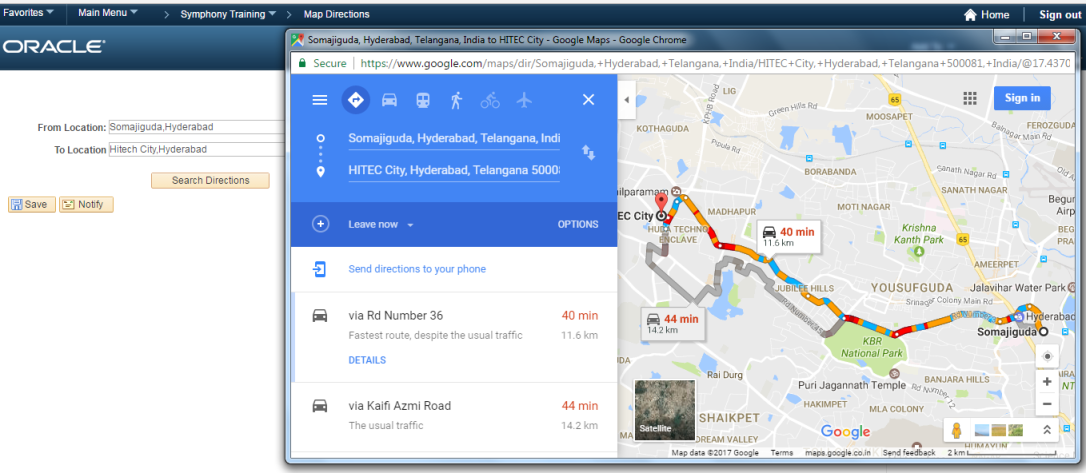
Now when we provide both from and to location we will get directions below.

Directions_2

Directions_3

Done..!!

PeopleSoft Concepts

PeopleSoft Smart HR Templates

Smart HR templates are a simplified and streamlined approach to completing various transaction processes, such as hiring, updating a person’s personal or job data, or managing a person’s profile data.

In this post you can find the basic simple example setup for custom Smart HR Templates.

Step1: Template Record/Field Creation

Step2: Template Section Creation

Step3: Create/ Update Template Transaction Type

Step4:Template Creation


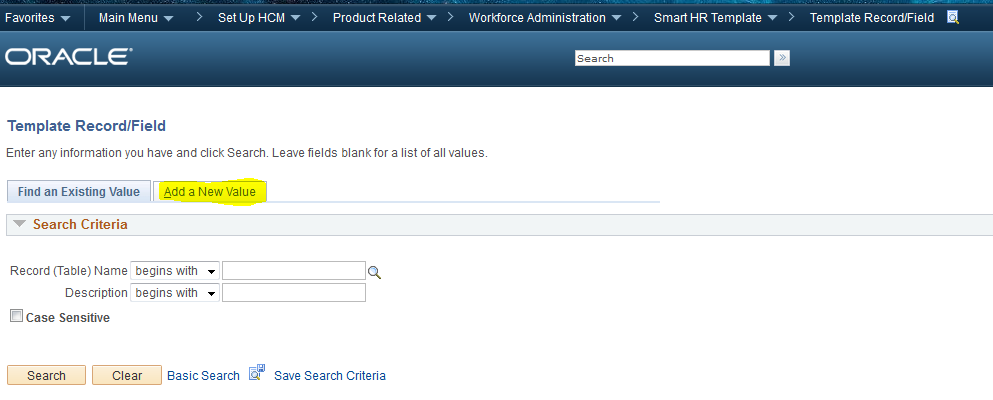
Step1: Template Record/Field Creation:

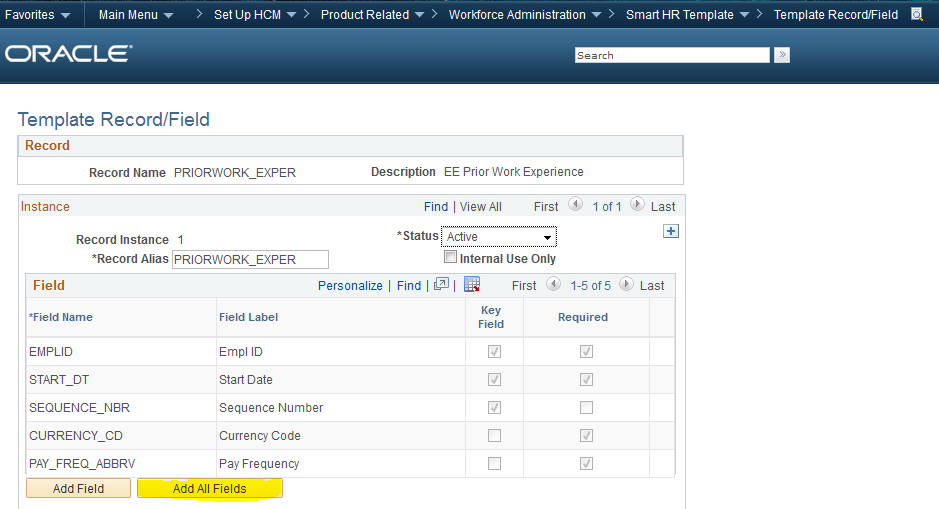
Create a new record or updating an existing record which have to be used in section as shown below Navigation.

Smart Hr_Record

Provide your Record Name and select required fields based on user requirement.

Smart Hr_Record 2.PNG

Step2: Template Section Creation:

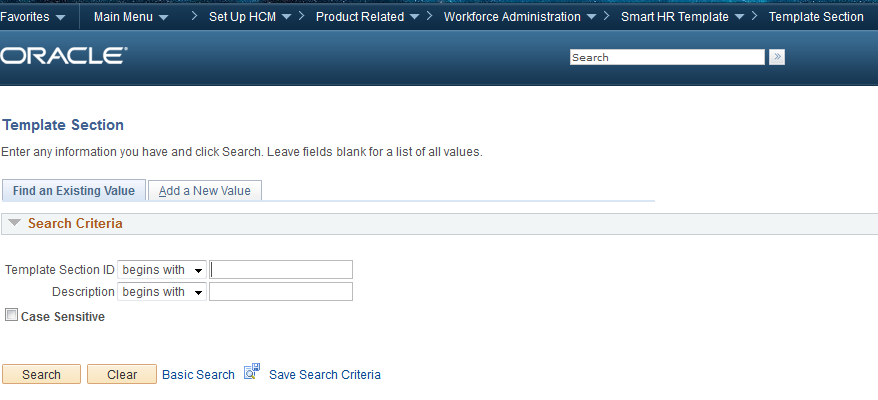
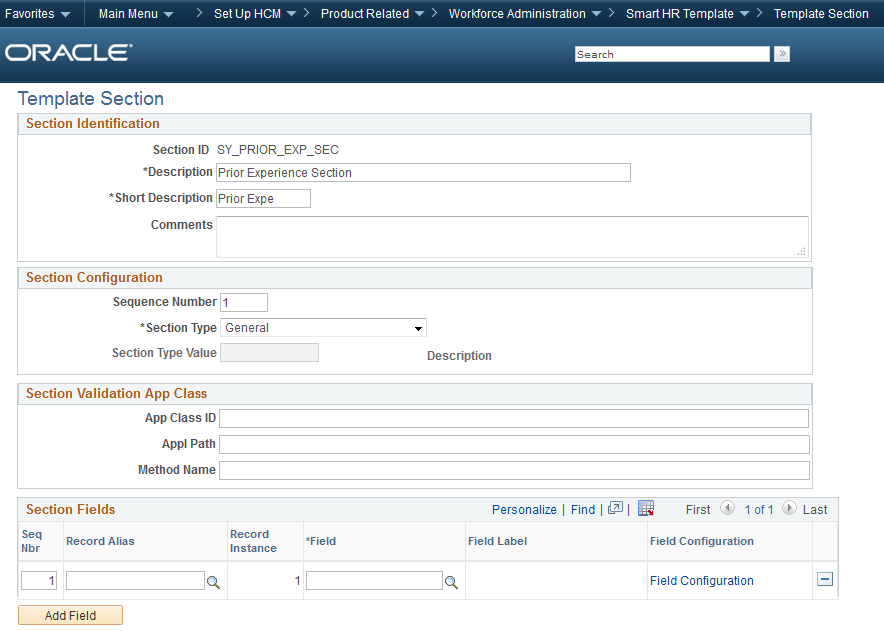
Template Section is used to identify and configure sections, list and configure the fields contained in a section. The fields available for templates are grouped into sections, like group boxes. User can determine which sections and the order in which the sections should be presented to the end user when creating a Smart HR template.  Sections and their fields are delivered as system data.

Navigation for creating the template section as shown below.

Smart Hr_Record 3

Provide Section ID and Description for the Template Section and add the section fields into your template section in “Section Fields” grid.

Smart Hr_Record 4

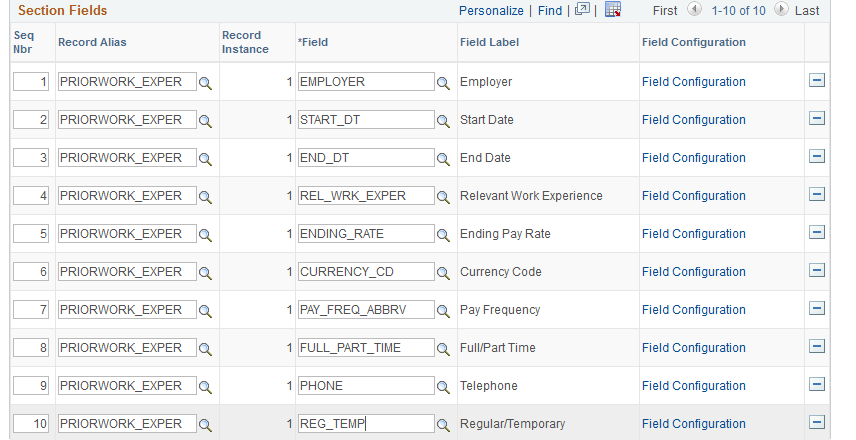
In this example i have added fields as shown below.next,Save the component.

Smart Hr_Record 7.PNG

Step3: Create/ Update Template Transaction Type:

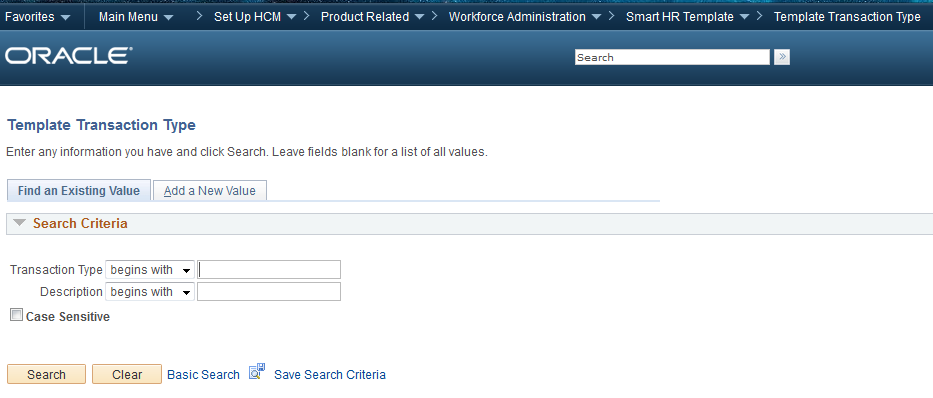
Template transaction type  Navigation as shown below.

Smart Hr_Record 8

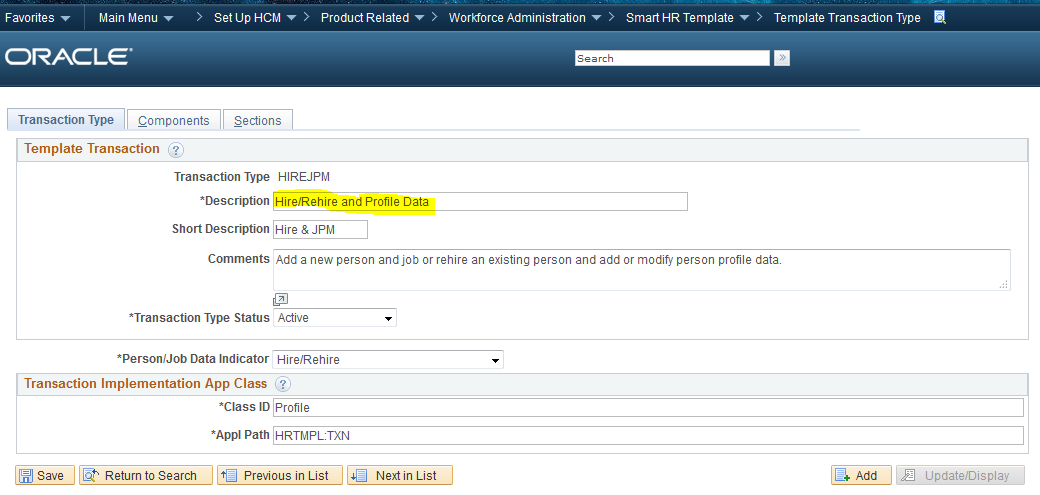
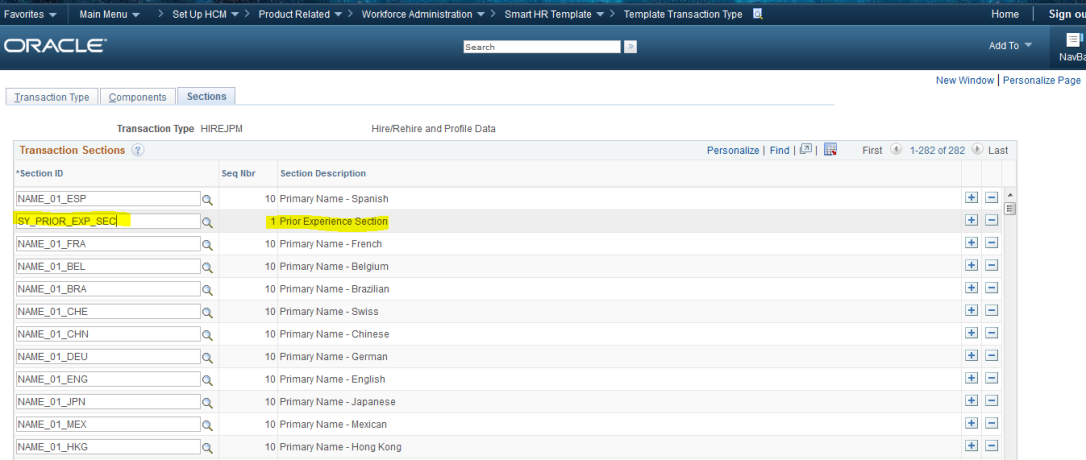
In this Example i have added the above created section into “HIREJPM” Transaction type and added corresponding component and section as the same.

Smart Hr_Record 9

Smart Hr_Record 10

Smart Hr_Record 11

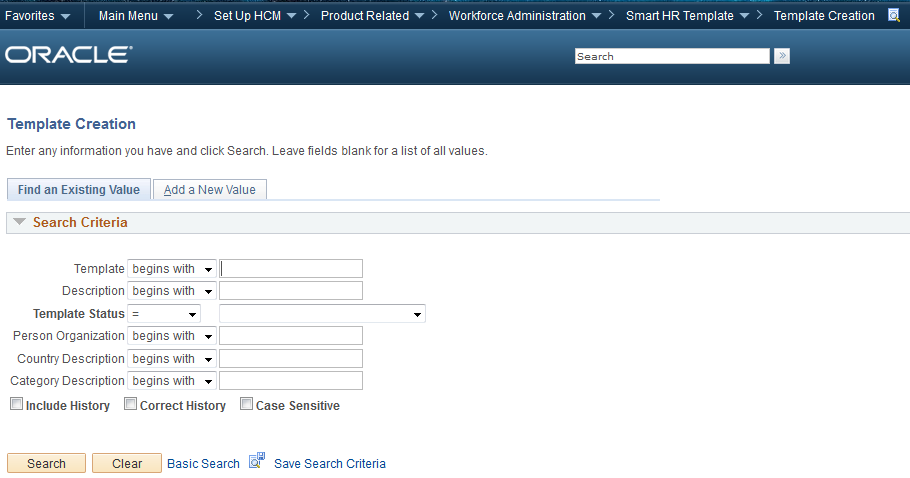
step4: Template Creation:

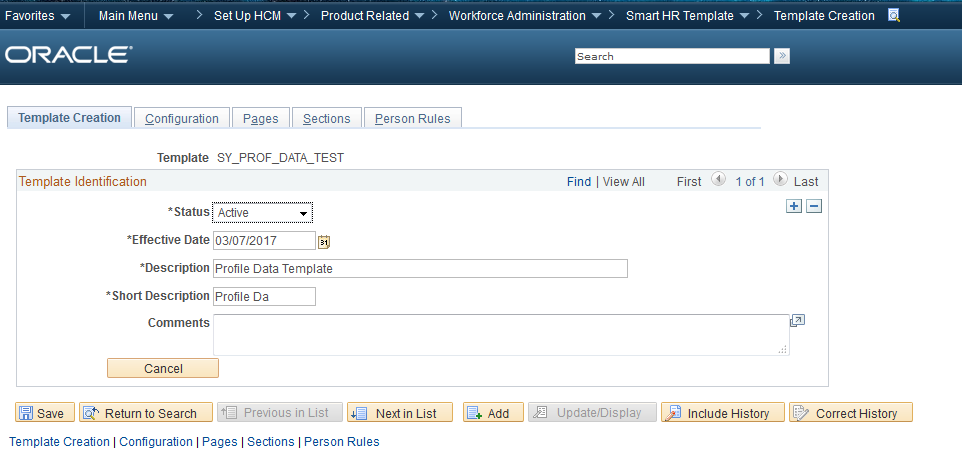
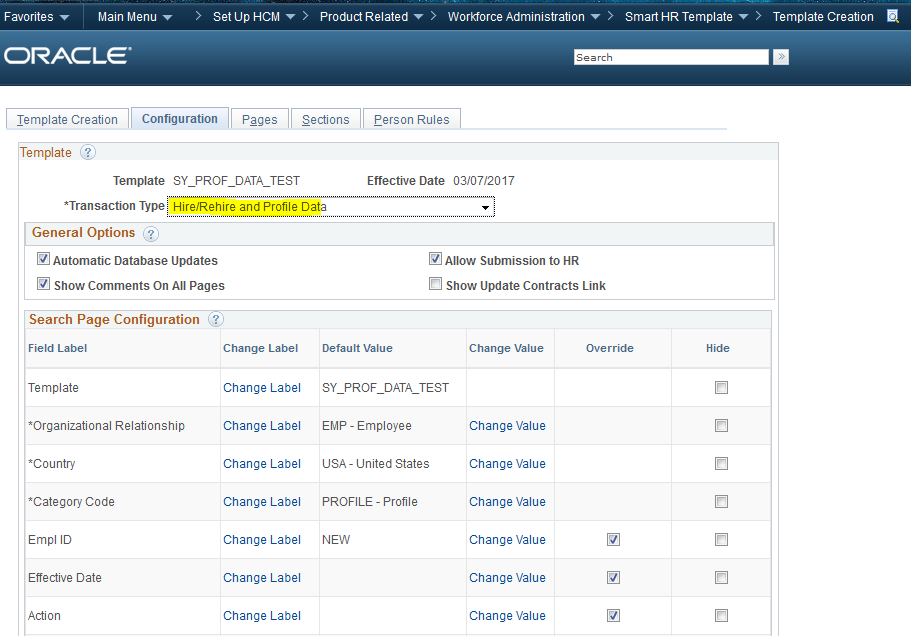
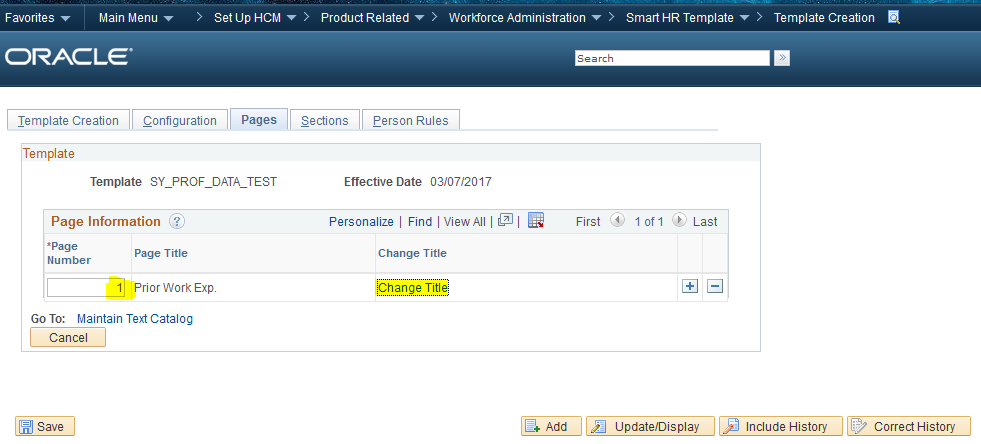
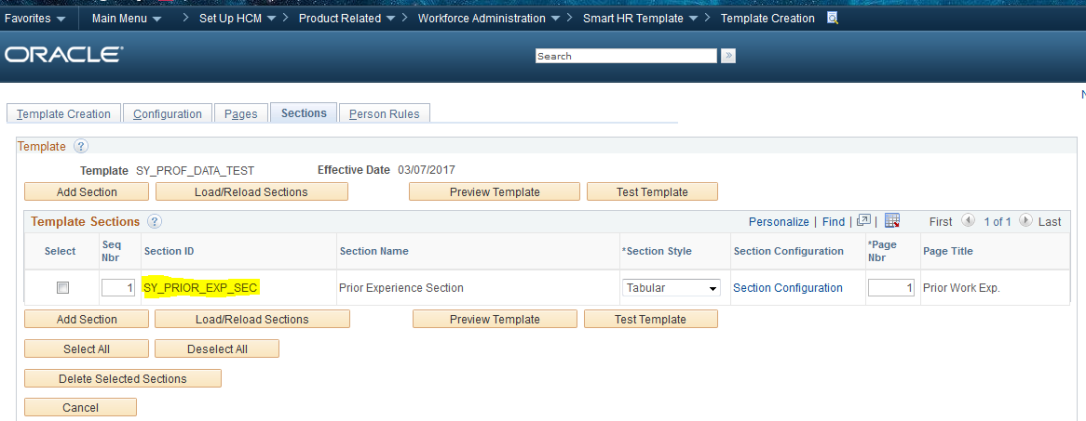
Here,in Template creation Page you can create a new template or update an existing template.In this example am creating new template as shown below.

Smart Hr_Record 13

Smart Hr_Record 14

Smart Hr_Record 15

Smart Hr_Record 16

Smart Hr_Record 17

Now,setup for Smart HR templates has been completed.

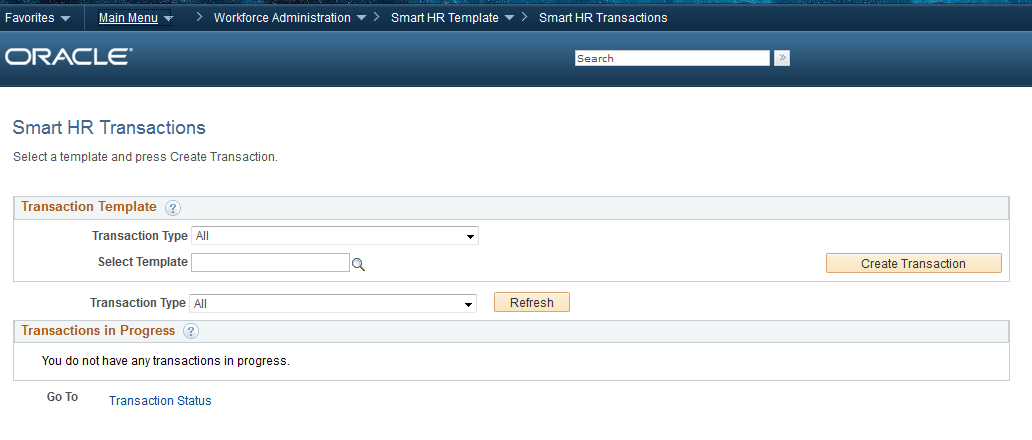
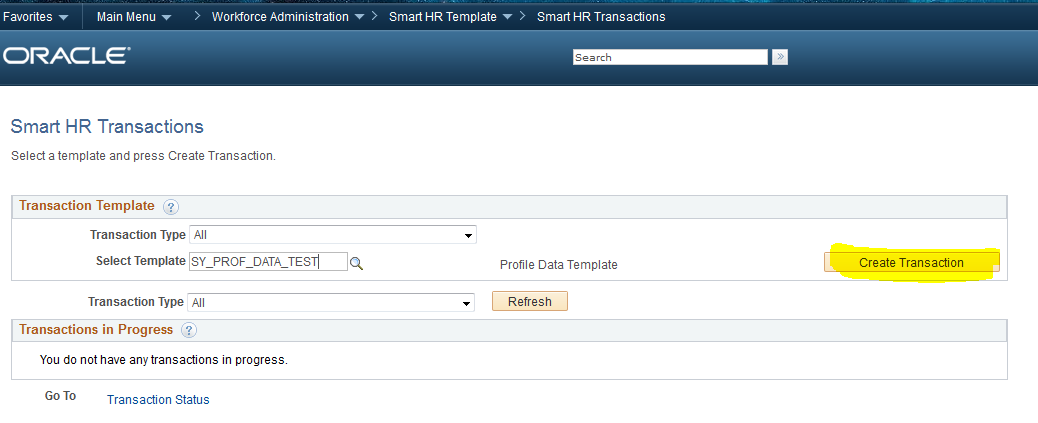
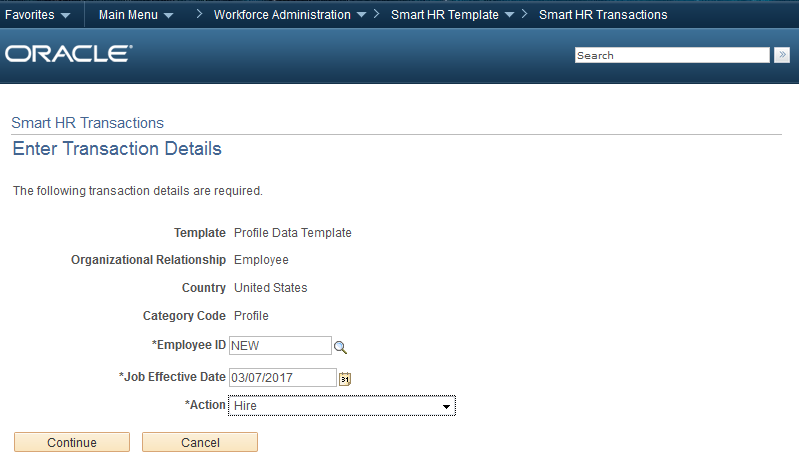
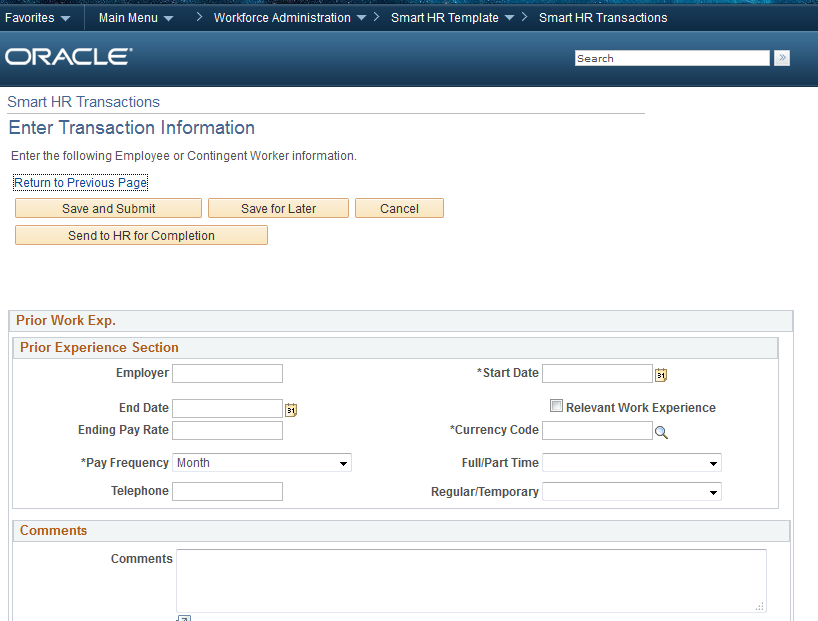
let’s see our created template as shown below.

Smart Hr_1

Smart Hr_2

Smart Hr_3

Smart Hr_4

In the above screen print shows our created custom template as expected..!!

Hope this post will give you basic idea about Custom smart HR Templates.(this example is completely on my own idea only)